A Poor Girl's Guide to Purchasing A Domain Name

I was twelve when the Internet was introduced to me at a computer class and it has since fascinated me like a cat seeing the red dot for the first time. I've always thought it would be super cool to have a website of my own, with my name between www and dot com and a bigass photo of myself on the banner. So when I discovered blogging in 2005, I knew it was something I'm gonna be doing for a really long time.
I have done pretty much everything I want with my blogs for the past 10 years I've been blogging. Of course, that includes having a bigass photo of myself as the banner, lol that was a long time ago. However, there's this one thing I never had the chance to do but I've always wanted to:
BUY MY OWN DOMAIN NAME
- I couldn't afford it. Valid excuse for me who started out as a college student who's not a huge fan of saving money.
- I don't have a credit card. I thought it's the only way I could purchase and unfortunately, I don't own a magic plastic card because I choose not to. I know myself too well to never let it get anywhere near my problematic spending habits.
- I don't wanna borrow someone else's credit card. Too paranoid and scared of online fraud and I don't want to cause anyone that kind of trouble. I'd take the risk if the card was mine.
- I don't know how. Lame excuse for just being lazy to figure it out.
So today I am writing this "How To Purchase a Domain Name" guide for my fellow bloggers who:
1. Want their own domain name
2. But don't know how to get one or where to start
3. And they don't own a credit card, like me
4. And they don't wanna borrow another person's credit card for online transactions, like me
5. But they really really really want to have their own domain name for their blog
If you happen to be one or all of the above, then let me send you my virtual hugs first because I thought I was the only one who has this kind of dilemma! Aaahhh misery does love company!
I'm not saying this is how it's supposed to be done, okay? What I'm gonna be sharing you today is how I was able to buy my domain considering all 5 of my excuses above.
*Here's what you need before we get started:
- An account at Namecheap.com - you can sign up anytime, it's for FREE! This is where I chose to buy my domain name because my friend, Google, said Namecheap accepts Paypal.
- A Paypal account - An unverified Paypal account will do. An unverified Paypal account is one that doesn't have a debit/credit card linked to it. Namecheap accepts fund transfers from Paypal accounts, even unverified ones.
- At least $12 worth of funds on your Paypal account - You will need this to add funds to your Namecheap account so you can purchase the domain name using your funds. If you know someone who has Paypal, you can ask them to send you funds and pay them in cash OR try Paypal To Cash In A Rush, I transfer my Paypal funds to my bank account with their help and they do send Paypal funds too (I asked)
Now, let's hit it...
Step 1: GO TO NAMECHEAP.COM AND CHECK IF YOUR DOMAIN NAME IS AVAILABLE

For this guide, I tried www.nokniknoknik.com
Step 2: IF IT IS AVAILABLE, HURRAY! NOW, CHECK OUT / CLICK THE SHOPPING CART BUTTON


Step 3: CONFIRM YOUR ORDER

The $10.87 price is around 500+ pesos for 1 year so that's like Php41.00 per month! Not bad, right? #BestInMath
Step 4: CHOOSE YOUR PAYMENT METHOD
 My Paypal account is unverified so that means I can't choose the Paypal Option from their Payment Methods because I don't have a credit card that they can charge every year to renew the service. So I chose "Account Funds" instead. I think this option is the safest.
Step 5: ADD FUNDS TO YOUR NAMECHEAP ACCOUNT THRU PAYPAL

The domain name costs $10.87, so I sent $11 to my Namecheap account from my Paypal. This is why I said you need at least $12 worth of funds on your Paypal.

After clicking "Proceed to Paypal", you will be redirected to this page where you have to log in to your Paypal account so you can send the funds.

You must have funds ready in your Paypal account or else, you will be redirected again to a page requiring you to add a card and I assume you don't have a card, like me, so that's a dead end. This is why you need funds on your Paypal account first before we get started.
So, did you guys follow? Were you able to send funds from your Paypal to your Namecheap account? Well, congratulations!
But we're not done yet! You have only purchased the domain name, but how do you set it up on your blog?
That's the part where my brain bled.
And I honestly don't wish all that brain-ache upon you guys so I will try my best to guide you through it anyway.
Step 6: SET-UP YOUR DOMAIN NAME ON YOUR BLOGGER ACCOUNT
On your Blogger Dashboard, go to Settings then choose Basic
 Under publishing, click on "+ Setup a 3rd party URL for your blog"


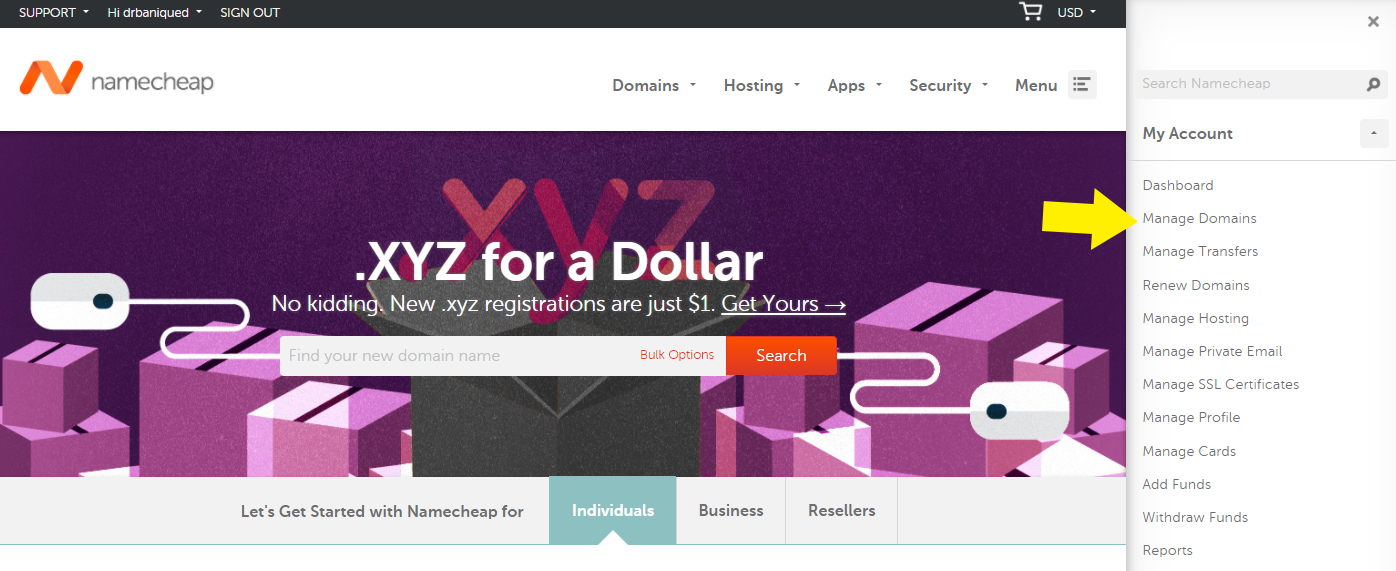
 Go to Namecheap.com and click "Manage Domains"

Click on your newly purchased domain name

Then go to "All Host Records"

- Copy the values under Name, Label, or Host field (from Blogger) then paste it under the Host Name field (Namecheap)
- Copy the values under Destination, Target, or Points To field (from Blogger) then paste it under "IP Address/URL" field (Namecheap)
- Don't forget to select CNAME from the "Record type" drop-down menu under "Subdomains Settings"
Then finally, click SAVE CHANGES.
You will have to wait for a couple of minutes before Blogger verifies your new domain so just sit back, relax, because the next thing you know, you already got your own domain name!
And that's it! It took me many years and a shitload of Google searches to finally get to buy my own domain name because of "my situation AKA excuses" and I thought it would be very nice of me to help those who are going through the same issues!
I hope I was able to help you guys somehow. If for some reason, this guide still confuses you, maybe this one by Namecheap won't!
- I don't have a credit card. I thought it's the only way I could purchase and unfortunately, I don't own a magic plastic card because I choose not to. I know myself too well to never let it get anywhere near my problematic spending habits.
- I don't wanna borrow someone else's credit card. Too paranoid and scared of online fraud and I don't want to cause anyone that kind of trouble. I'd take the risk if the card was mine.
- I don't know how. Lame excuse for just being lazy to figure it out.
So today I am writing this "How To Purchase a Domain Name" guide for my fellow bloggers who:
1. Want their own domain name
2. But don't know how to get one or where to start
3. And they don't own a credit card, like me
4. And they don't wanna borrow another person's credit card for online transactions, like me
5. But they really really really want to have their own domain name for their blog
If you happen to be one or all of the above, then let me send you my virtual hugs first because I thought I was the only one who has this kind of dilemma! Aaahhh misery does love company!
I'm not saying this is how it's supposed to be done, okay? What I'm gonna be sharing you today is how I was able to buy my domain considering all 5 of my excuses above.
*Here's what you need before we get started:
- An account at Namecheap.com - you can sign up anytime, it's for FREE! This is where I chose to buy my domain name because my friend, Google, said Namecheap accepts Paypal.
- A Paypal account - An unverified Paypal account will do. An unverified Paypal account is one that doesn't have a debit/credit card linked to it. Namecheap accepts fund transfers from Paypal accounts, even unverified ones.
- At least $12 worth of funds on your Paypal account - You will need this to add funds to your Namecheap account so you can purchase the domain name using your funds. If you know someone who has Paypal, you can ask them to send you funds and pay them in cash OR try Paypal To Cash In A Rush, I transfer my Paypal funds to my bank account with their help and they do send Paypal funds too (I asked)
Now, let's hit it...
Step 1: GO TO NAMECHEAP.COM AND CHECK IF YOUR DOMAIN NAME IS AVAILABLE

For this guide, I tried www.nokniknoknik.com
Step 2: IF IT IS AVAILABLE, HURRAY! NOW, CHECK OUT / CLICK THE SHOPPING CART BUTTON

Since it was my first time to purchase a domain name and I was scared of screwing it up and losing my hard earned $$$, I settled for only 1 year of registration just to be safe. #PraningProblems

Step 4: CHOOSE YOUR PAYMENT METHOD

Step 5: ADD FUNDS TO YOUR NAMECHEAP ACCOUNT THRU PAYPAL

The domain name costs $10.87, so I sent $11 to my Namecheap account from my Paypal. This is why I said you need at least $12 worth of funds on your Paypal.

After clicking "Proceed to Paypal", you will be redirected to this page where you have to log in to your Paypal account so you can send the funds.

You must have funds ready in your Paypal account or else, you will be redirected again to a page requiring you to add a card and I assume you don't have a card, like me, so that's a dead end. This is why you need funds on your Paypal account first before we get started.
So, did you guys follow? Were you able to send funds from your Paypal to your Namecheap account? Well, congratulations!
But we're not done yet! You have only purchased the domain name, but how do you set it up on your blog?
That's the part where my brain bled.
And I honestly don't wish all that brain-ache upon you guys so I will try my best to guide you through it anyway.
Step 6: SET-UP YOUR DOMAIN NAME ON YOUR BLOGGER ACCOUNT


Fill in the blank field next to http:// with the domain name you just purchased then click SAVE

After saving, you should see 2 CNAME records that you will have to set up on your Namecheap account
Step 7: SET-UP YOUR DOMAIN NAME ON YOUR NAMECHEAP ACCOUNT

Click on your newly purchased domain name

Then go to "All Host Records"

Remember the 2 CNAME records provided by Blogger after saving your new domain name?
- Copy the values under Name, Label, or Host field (from Blogger) then paste it under the Host Name field (Namecheap)
- Copy the values under Destination, Target, or Points To field (from Blogger) then paste it under "IP Address/URL" field (Namecheap)
- Don't forget to select CNAME from the "Record type" drop-down menu under "Subdomains Settings"
Then finally, click SAVE CHANGES.
You will have to wait for a couple of minutes before Blogger verifies your new domain so just sit back, relax, because the next thing you know, you already got your own domain name!
And that's it! It took me many years and a shitload of Google searches to finally get to buy my own domain name because of "my situation AKA excuses" and I thought it would be very nice of me to help those who are going through the same issues!
I hope I was able to help you guys somehow. If for some reason, this guide still confuses you, maybe this one by Namecheap won't!


Hi, is it okay to pay the exact price to the last centavo? You paid $11. Did u receive a change or something from paypal? #brokeblogger
ReplyDeleteHmmmm I sent $11 because I thought there would be some charges when I transfer funds from Paypal to Namecheap but wala pala hehe. But I do have $0.13 on my Namecheap account right now so it's pretty much stuck there until I have to renew my domain's registration next year! ;)
DeleteHi. Tnx for the info. If u do that thing. My blogspot will be erased. So, i can used my real domain name...so, do u think my blogspot wont be erased. Tnx much.
ReplyDeleteHi Seraphim! No, your Blogspot url won't be erased. Your new domain name is basically just your website/blog's address/url that appears on the address bar of your browser but you can still use your old .blogspot.com url and it will still go to your blog. Sorry, not so much of a techie but that's how I understand it LOL
DeleteGrabe getting a domain name is as cheap as getting a new layout! Haha My excuse was that I'm too lazy to even google and was a bit intimidated about the price. This guide is very thorough! Thank you for sharing! :)
ReplyDeleteI know! And I'm so happy I finally did it! You're welcome Ochi! I'm glad to be of help! ;)
DeleteThis is very helpful! Filing this under "For future use." My blog's still a baby so I'm growing it first. I love your blog's design btw. Especially your logo. 😊
ReplyDeleteThanks Mailan! So glad you liked it! Goodluck on your baby blog! Def. checking it out! <3
DeleteSame here, I couldn't afford it back then. Even now, I'm still this broke trying to save until next year's domain renewal lol. I just got mine this year, then settled. Also, I had mine through bank deposit because back then I didn't know how Paypal works. Again, I'm so lame. But this is highly informative, Dom. Great post!
ReplyDeleteLou | wander-soul.net
Really good, informative post! Domain names can get expensive. I remember the time we hurriedly pay for a domain name for our capstone. Bad times.
ReplyDeleteLet me just share a tip for everyone who is yet to buy a domain name (and the one I used): google for promo codes. For example, I bought my domain name from GoDaddy. I googled "GoDaddy Promo Codes 2015". Because of that, I was able to buy my domain for only $1. Less than PHP50 with tax included for a YEAR! Which is why I already bought my domain name. Really affordable! :)
Just stumbled upon your blog because a friend's asking how to setup domain name through namecheap. This helped a lot! I'm using GoDaddy though because I availed their sale for the first year, but I won't be renewing with them (it's hella expensive! It's 3k+!!!). I'll be transferring to Namecheap by next year :)
ReplyDeleteMimi | Chasing Bleu
This is really helpful! :) I'm currently using Pangalan.com bec it was the first one that I stumbled upon hehe! :)
ReplyDeletewww.jhanzey.net
I didn't know I could actually use my PayPal account! Thanks for this. :) You followed me on Tumblr and I found a link to your blog. To be honest though, my main reason for not buying a domain name is knowing I won't be pursuing a career out of blogging, and if I keep on blogging without having to spend anything, why not opt for it instead? :)
ReplyDeleteWow thank you for sharing this! Super helpful! May I ask if the server (namecheap) is reliable? Hindi naman siya nag da-down minsan?
ReplyDelete